Sphinx
https://sphinx-users.jp/gettingstarted/install_windows.html を参考に作業実施
1.Pythonインストール
公式Pythonインストーラを使用
Python2はサポート切れのため、Python3をインストール
Download Python 3.10.4をクリックしてダウンロード
ダウンロードしたpython-3.10.4-amd64.exeを起動
Install Now -> Close
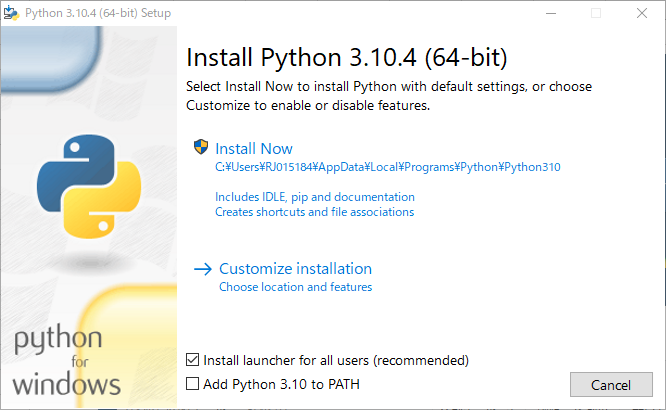

Closeボタン押下
コマンドプロンプト起動:
cd %USERPROFILE%\AppData\Local\Programs\Python\Python310
dir /w
python -V
2.Sphinxインストール
コマンドプロンプト起動。venv を使用して仮想環境をユーザのホームディレクトリ配下に mysphinx という名前で作成する。:
py -m venv %USERPROFILE%\mysphinx仮想環境に入る。:
%USERPROFILE%\mysphinx\Scripts\activatepip コマンドでインストール。コマンドプロンプトに以下のようにタイプしエンターキーを押す。:
pip install sphinx Pillow# 正常にインストールが完了した場合の表示例:
Successfully installed Jinja2-2.11.2 MarkupSafe-1.1.1 Pillow-7.1.2 Pygments-2.6.1 alabaster-0.7.12 babel-2.8.0 certifi-2020.4.5.1 chardet-3.0.4 colorama-0.4.3 docutils-0.16 idna-2.9 imagesize-1.2.0 packaging-20.4 pyparsing-2.4.7 pytz-2020.1 requests-2.23.0 six-1.15.0 snowballstemmer-2.0.0 sphinx-3.0.4 sphinxcontrib-applehelp-1.0.2 sphinxcontrib-devhelp-1.0.2 sphinxcontrib-htmlhelp-1.0.3 sphinxcontrib-jsmath-1.0.1 sphinxcontrib-qthelp-1.0.3 sphinxcontrib-serializinghtml-1.1.4 urllib3-1.25.9Sphinx がインストールされた事を確認:
sphinx-quickstart --version# 正常にインストールが完了した場合の表示例:
sphinx-quickstart 3.0.4インストール作業は以上
3.Sphinx起動
sphinx-quickstart
4. ビルド
make html%USERPROFILE%\AppData\Local\Programs\Python\Python310\_build\html\index.htmlにドキュメントが生成される